Introduction
Since I want to install Ubuntu on my MacBook Air (Early 2015), I have tried using flash drive as an installation disk to install Ubuntu, but attempting to boot Ubuntu after install is a great pain. I heard that rEFInd could be a great tool for Mac to boot other system beside macOS.
In order to successfully boot to Ubuntu, you should install Ubuntu at first, then install rEFInd. Please finish reading this article before actually perform the installation. Additionally, I have tried install Ubuntu to an external drive for multiple times, but every time Mac would fail to boot into Ubuntu.
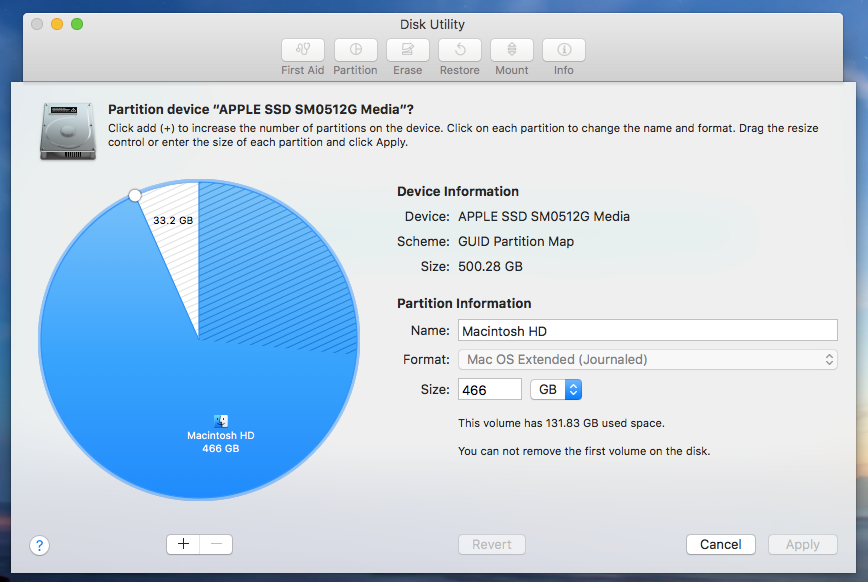
Hence you need to split your macOS partition by opening Disk Utility, and install Ubuntu to Mac's internal hard drive thereafter (if you turn the FileVault on, you need to turn it off and let it finish decrypting before splitting the partition).
Note: If you have macOS High Sierra installed on an APFS volume and have FileVault turned on, you can shrink the APFS container without decrypting in the Recovery OS, but you need to unlock the volume at first before shrinking.
Install Ubuntu
1. Visit http://releases.ubuntu.com/ and download any release of Ubuntu (I use the version of 16.04 and get worked, you can try using other releases, but it has to be amd64 architecture). I'll use Kubuntu 16.04.1 in this tutorial.
2. Create a bootable USB installation disk (or maybe a DVD) from the image you've just downloaded, I recommend using rufus to do this (If you are currently using Windows)
3. Download rEFInd (open "A binary Debian package page" if you follow this tutorial) by clicking the text proceeded this. Copy the .deb file to the flash drive (Ubuntu installation disk), you will definately use this later
4. Insert the flash drive to MacBook Air, hold pressing the "option" key, and turn it on. On the boot menu, select "EFI Boot"
5. Once finished booting, select the language and click "Install Ubuntu", when you have arrived at "Disk Setup" page, choose "Manual"
6. Find the new partition that you've created (you can try identify this by looking at the partition size), format this to ext4 and set the mount point of /
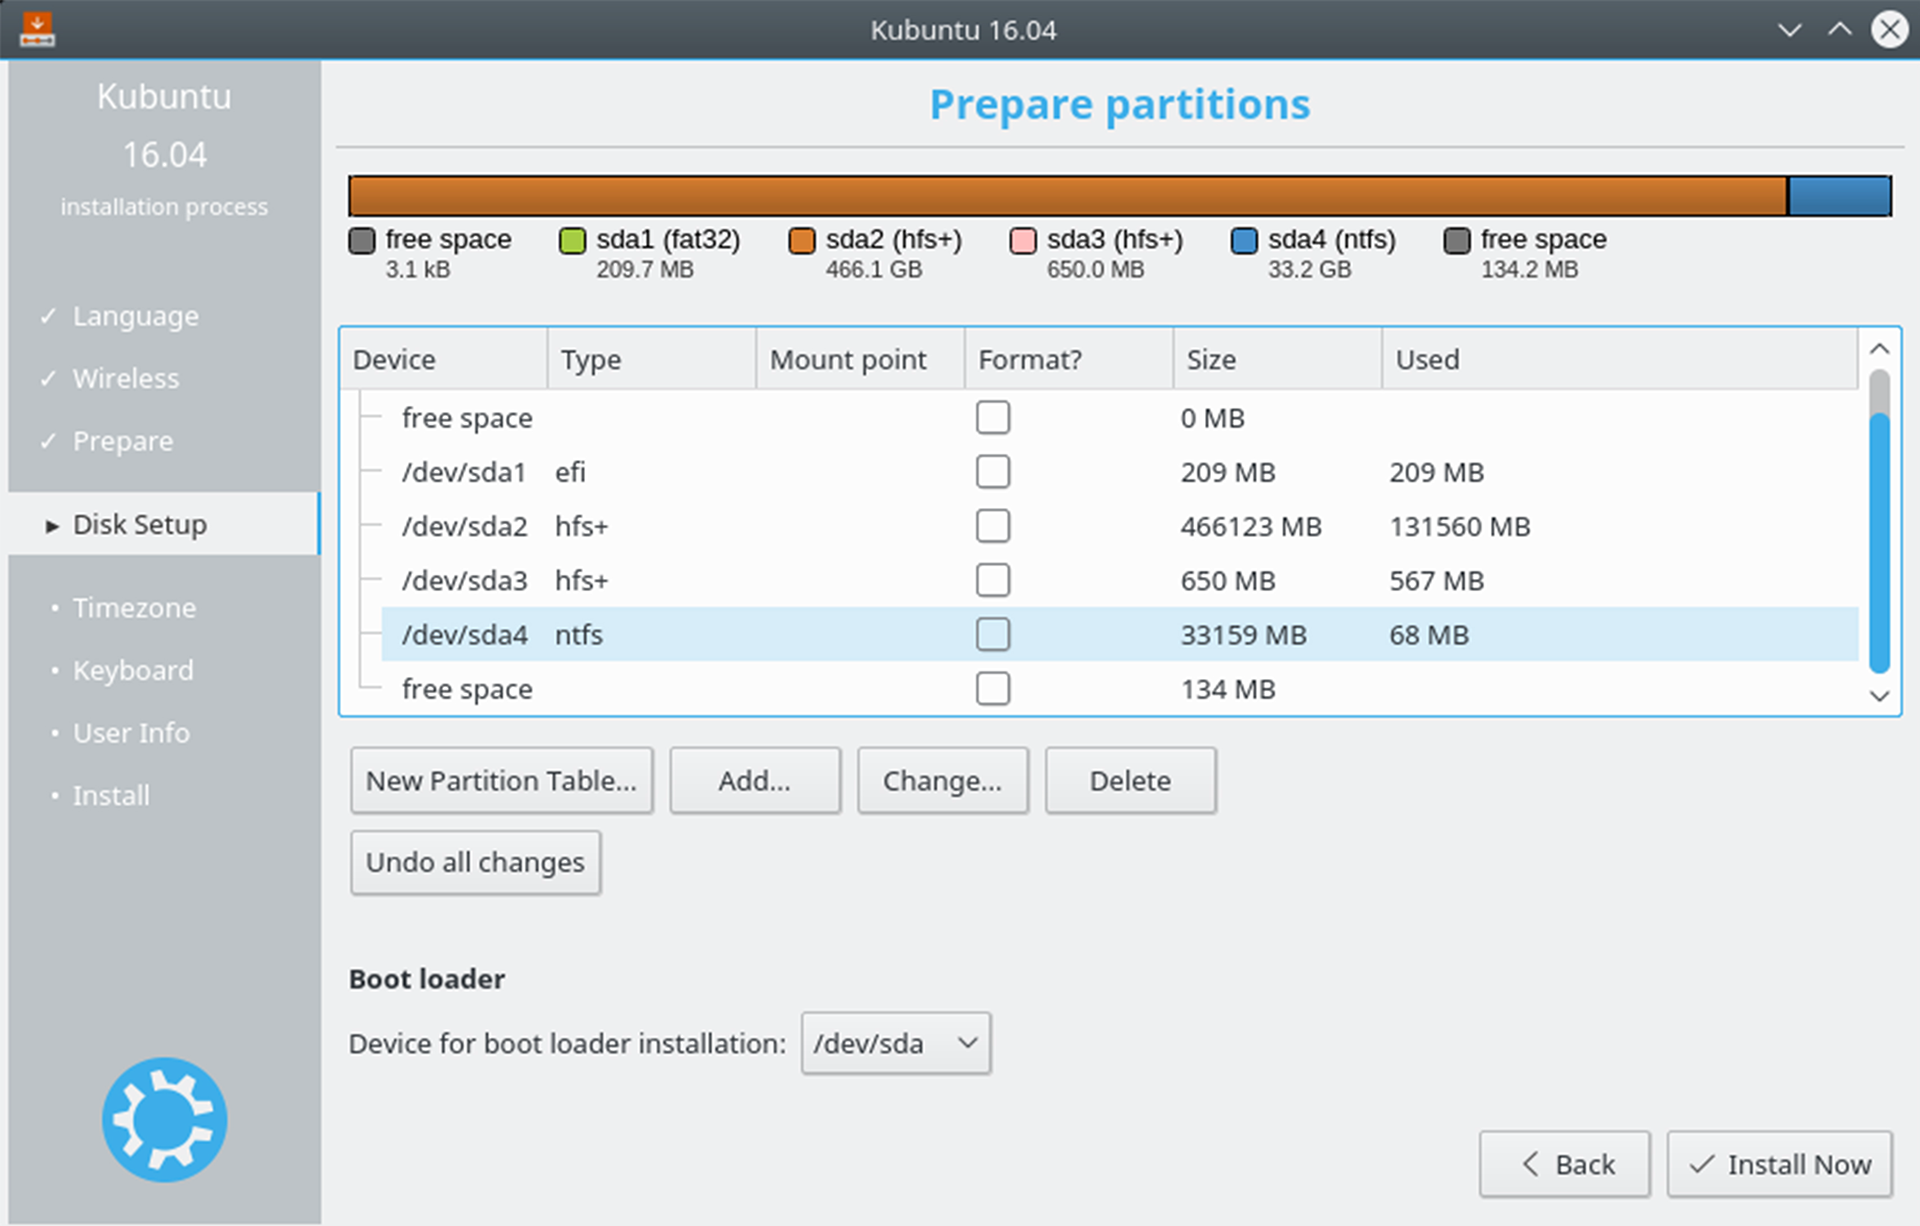
Before
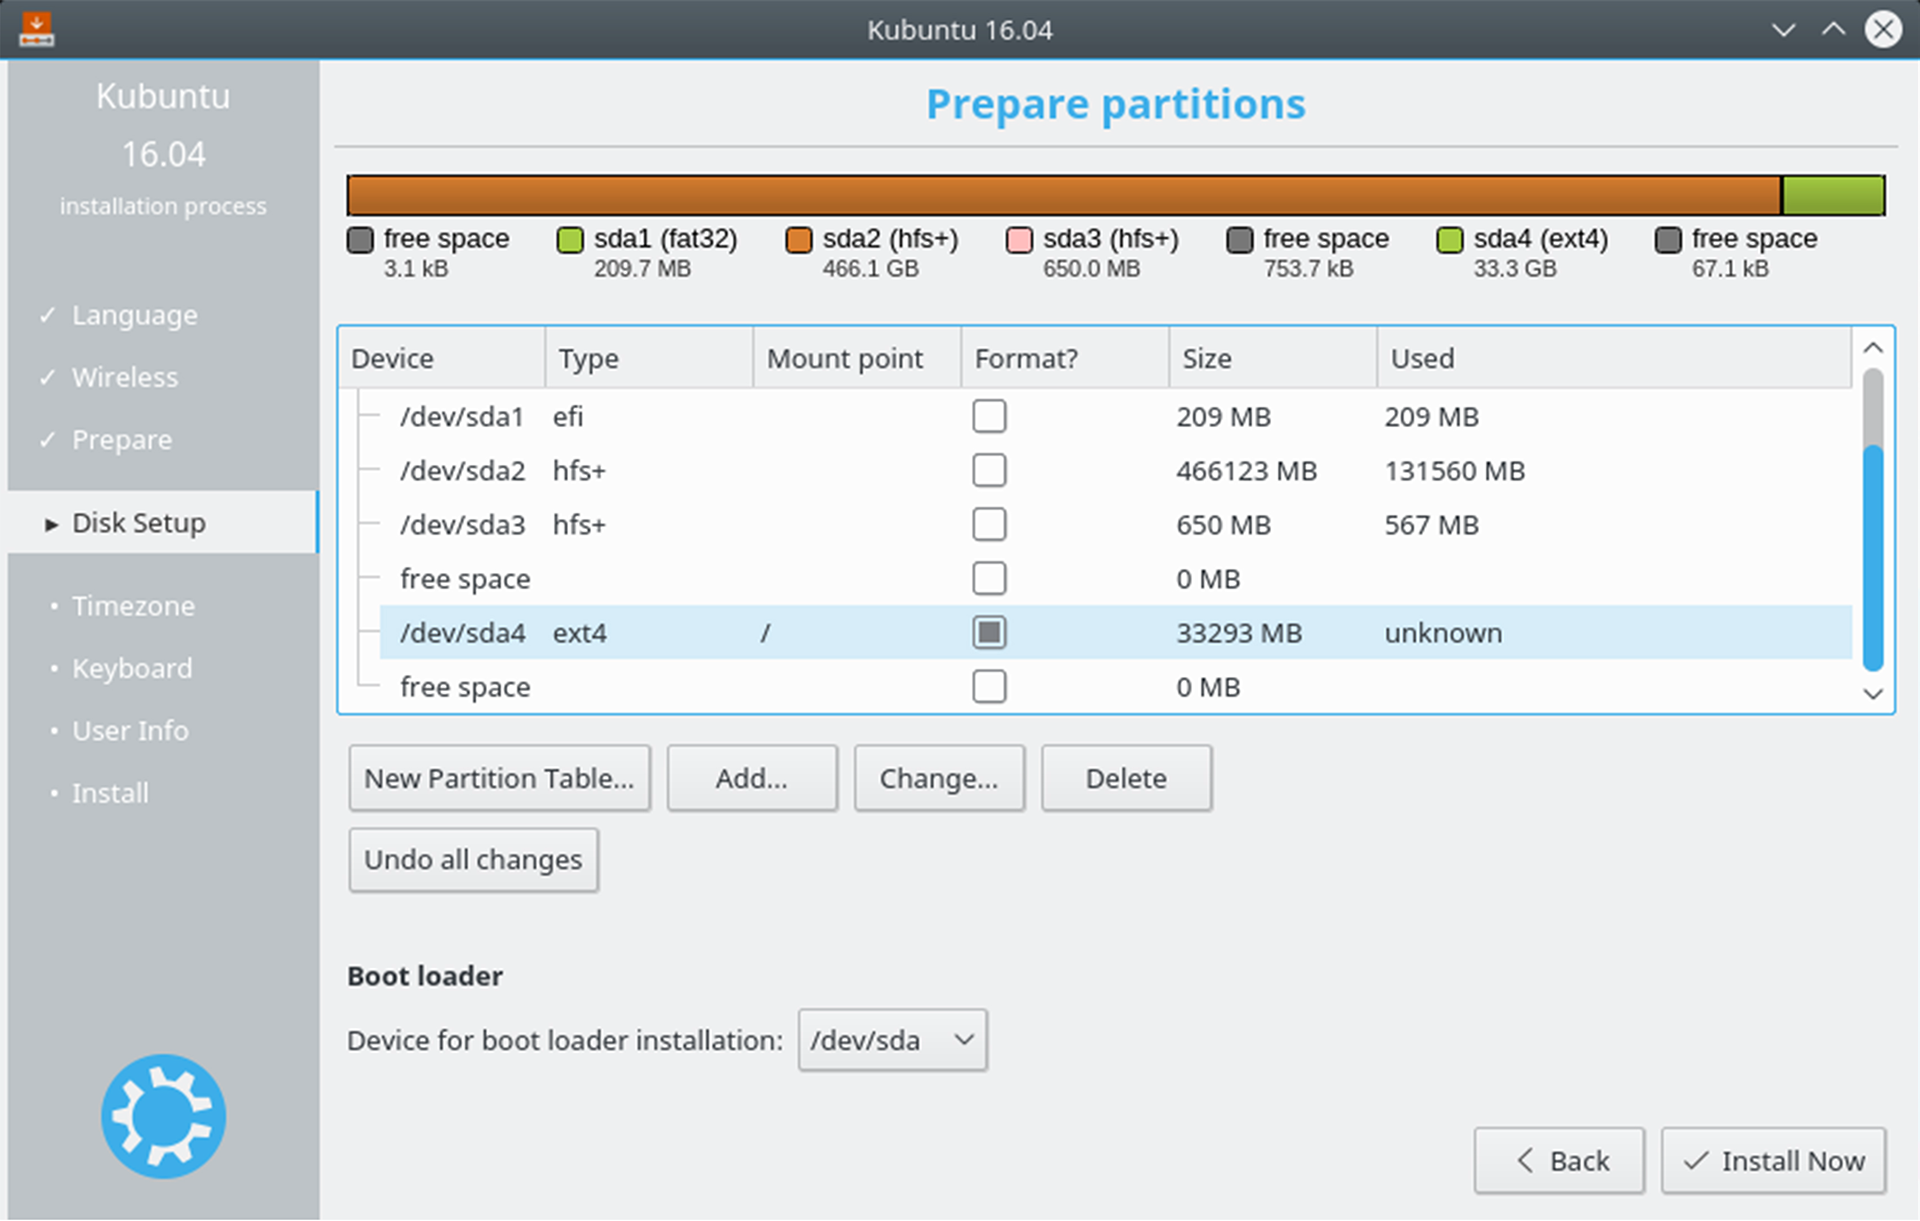
After
This picture above is just an example, you can also try delete it and make more partitions if you wish (make sure not to delete any partitions that still contain your files). You may also consider choose adding a swap partition (like a virtual memory on a disk))
4. You will be able to finish the installation after this
After finish installing, reboot the computer, but you can only boot to Ubuntu, so you need to install rEFInd.
Install rEFInd
After visiting the rEFInd website, I have found out that you are no longer able to install rEFInd in macOS (after OS X 10.11).
Find your rEFInd installer, and install rEFInd. When finished, the content of EFI folder inside the efi partition should have folders that with name "Apple", "refind", "tools", and "Ubuntu" (you might need a root privillege in order to access the EFI partition). Then, reboot MacBook Air, you can see the rEFInd menu right after you heard the startup sound, and you can boot into both Ubuntu and macOS.
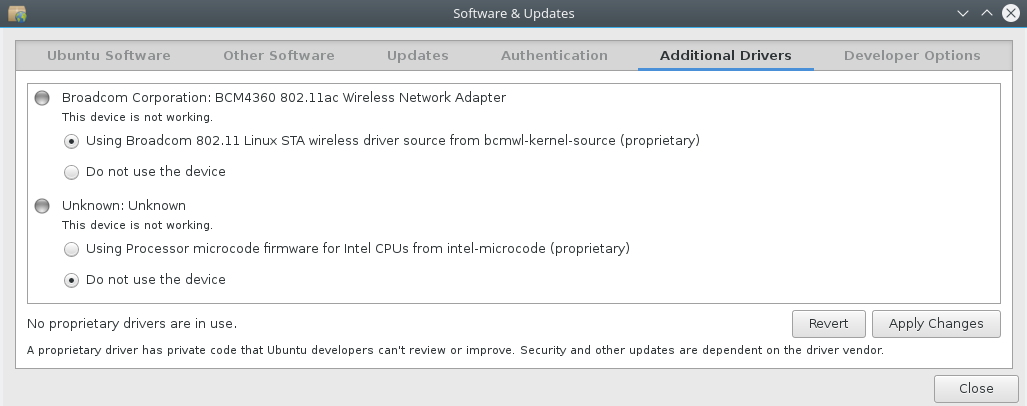
For Macs that only have Broadcom wireless card, you won't able to connect to network. You have to plug an external network card (either wireless or wired) and install the Broadcom driver by following these steps
Deal with Broadcom wireless card
1. Plug in a network card that is supported by Linux, Edimax EW-7811Un 150Mbps 11n Wi-Fi USB Adapter is one of the supported ones.
2. Open System Settings, and navigate to Driver Manager (you may still need an active network connection)
If you see nothing in Driver Manager after several minutes, you might try opening Software & Update app (if not installed, run sudo apt install update-manager in a terminal)
3. Select "Using Broadcom 802.11 Linux STA wireless...." and click apply, or open a terminal and execute sudo apt install bcmwl-kernel-source
4. After the installation, reboot and you will be able to use MacBook Air's wireless card.
Update the system
Before connect to network, we need to turn off auto update (otherwise you might not able to update the system and install software manually for a certain amount of time) and configure the source.
1. Open Update Manager, go to More, then Advanced, click on Configure Software Sources; or open Software&Updates. Check "Source Code" under Ubuntu Software. Under Other Software, check "Canonical Partners" and "Canonical Partners (Source Code)". Under Updates, uncheck "Check for updates" (if you are using Update Manager), change "Automatically check for updates" to "Never" and change "When there are security updates" to "Display immediately" (if you are using Software&Updates). Then, reboot your computer.
2. After connected to the network, update the system and install restricted components by executing these commands
sudo apt update
sudo apt upgrade
sudo apt install ubuntu-restricted-extras
sudo apt upgrade
sudo apt install ubuntu-restricted-extras
3. Reboot after finishing all commands
Note: If you cannot see rEFInd after reboot and you can only boot to Ubuntu, you should install rEFInd again.
Install the microcode firmware for Intel CPU
Execute sudo apt install intel-microcode in terminal
Add brightness control and fixes the sporadic freezing issue
Add these parameters to GRUB_CMDLINE_LINUX_DEFAULT (after splash, with a space in between) in /etc/default/grub:
intel_idle.max_cstate=1 acpi_backlight=vendor
The first parameter fixes the sporadic freezing issue, the other one gets backlight controls to work
Run update-grub2 to generate the new configuration
Function keys (optional)
By default the function keys control backlight and volume, so you must hold the fn key while pressing them to get their original functionality(F1-12). The fix for some old Ubuntu distros did the trick and made them work normally:
echo options hid_apple fnmode=2 | tee -a /etc/modprobe.d/hid_apple.conf
update-initramfs -u -k all
update-initramfs -u -k all
FaceTime Webcam
While the Facetime HD webcam is not supported by Linux kernel, some smart guy has reverse-engineered it and provided a fully working driver for Linux. I didn’t bother building a nice package which is quite useless here, just did the following:
See this article for installing this webcam driver. When proceeding this tutorial, change "Install the dependencies : # apt-get install linux-headers git kmod libssl-dev checkinstall" to "Install the dependencies : # apt-get install linux-headers-$(uname -r) git kmod libssl-dev checkinstall", and you don't need to install xzcat.
The bad thing about these 3-rd party drivers is that they must be rebuilt upon every kernel upgrade.
Backlight control fix
Note: this doesn't work after I finish executing these
Another weird problem is that after suspend you can get only discrete 0% or 100% brightness, but nothing in between. The same smart guy made a fix which suprisingly works on the new Air and Ubuntu. Execute these instructions in terminal.
git clone git://github.com/patjak/mba6x_bl
cd mba6x_bl
make
sudo make install
cd mba6x_bl
make
sudo make install
Try rebooting your Ubuntu to see that things have become far better than they were.
Power tuning
Note: I receive some error messages as soon as I run sudo powertop –auto-tune
Install powertop, run “powertop –auto-tune” and check the improvement. Add it to /etc/rc.local so it will run on every startup.
And finally cooling (Optional)
Install the package macfanctld. The default settings in /etc/macfanctl.conf will make your Air ice-cold like on OS X, but i prefer slowing the fan down and spending less power on cooling with the following config:
# Config file for macfanctl daemon
#
# Note: 0 < temp_X_floor < temp_X_ceiling
# 0 < fan_min < 6200
fan_min: 1000
temp_avg_floor: 45
temp_avg_ceiling: 55
temp_TC0P_floor: 52
temp_TC0P_ceiling: 60
temp_TG0P_floor: 50
temp_TG0P_ceiling: 58
# Add sensors to be excluded here, separated by space, i.e.
# exclude: 1 7
# will disable reading of sensors temp1_input and temp7_input.
exclude: 18 19
# log_level values:
# 0: Startup / Exit logging only
# 1: Basic temp / fan logging
# 2: Log all sensors
log_level: 0
Although the laptop becomes slightly warm, the CPU temperature never exceeds 70 degrees Celsius. Use the original config if you don’t like it.
Extra Notes
Enable mounting exFAT Volume
Execute sudo apt install exfat-utils in a terminal.
Enable mounting HFS+ Volumes
Execute sudo apt install hfsprogs hfsplus in a terminal.
Note: Ubuntu can only mount HFS+ volumes without journaling, Disk Utility in Mac OS X 10.10 (Yosemite) or under can turn off journaling.
After finishing all steps, reboot again
A little glitch that you should notice:
If your screen is black, even in macOS, usually because the brightness level is 0 (zero), try turning up the brightness level.
The text from the section "Add brightness control and fixes the sporadic freezing issue" to the section "And finally cooling" is adapted from lesavik.net/post/getting-ubuntu-linux-to-work-on-macbook-air-7.2/
I have tested this tutorial on MacBook Air (Early 2015) prior to posting it. Unfortunately, I no longer own this laptop, my apologize if parts of my tutorial no longer works.