It's very easy for install Ubuntu for Raspberry Pi to an MicroSD card, but a MicroSD card is slow and less durable compared to a USB flash drive. If you are familiar with Ubuntu on a regular PC previously, it is very easy for use Ubuntu on Raspberry Pi eventually. This tutorial will demonstrate you how to install Ubuntu on a flash drive, with a separate /home partition.
Update: Raspberry Pi 3 do officially support booting from a USB Mass Storage, along with other booting options beside boot from a SD card, hence you can follow that tutorial instead. For more information, please visit these 2 websites below:
https://www.raspberrypi.org/documentation/hardware/raspberrypi/bootmodes/msd.md
https://www.raspberrypi.org/documentation/hardware/raspberrypi/bootmodes/
https://www.raspberrypi.org/documentation/hardware/raspberrypi/bootmodes/msd.md
https://www.raspberrypi.org/documentation/hardware/raspberrypi/bootmodes/
The above method works for Raspbian, but may not work in Ubuntu Mate (you may need to modify the /etc/fstab file)
What you need
1. A MicroSD card (recommend U1 or faster, especially if you want to create a swap partition)
You still need to have an MicroSD card in order to boot to Ubuntu, but you don't need to have a card with a high capacity.
2. A USB flash drive (recommend a USB 3.0 flash drive, although Raspberry Pi only has USB 2.0 ports)
3. A Raspberry Pi (This image only works on Raspberry Pi 2 and 3)
4. An Ubuntu Mate 16.04 for Raspberry Pi image (download link is here, choose 16.04 and Raspberry Pi image)
Update: Ubuntu Mate has released an 16.04.2 image for Raspberry Pi, this image includes some updates since 16.04, but this tutorial is based on the original 16.04 version.
5. A computer that currently runs Linux
First thing first, boot your computer to Linux, and install Gparted if it is not installed yet.
Prepare your MicroSD card
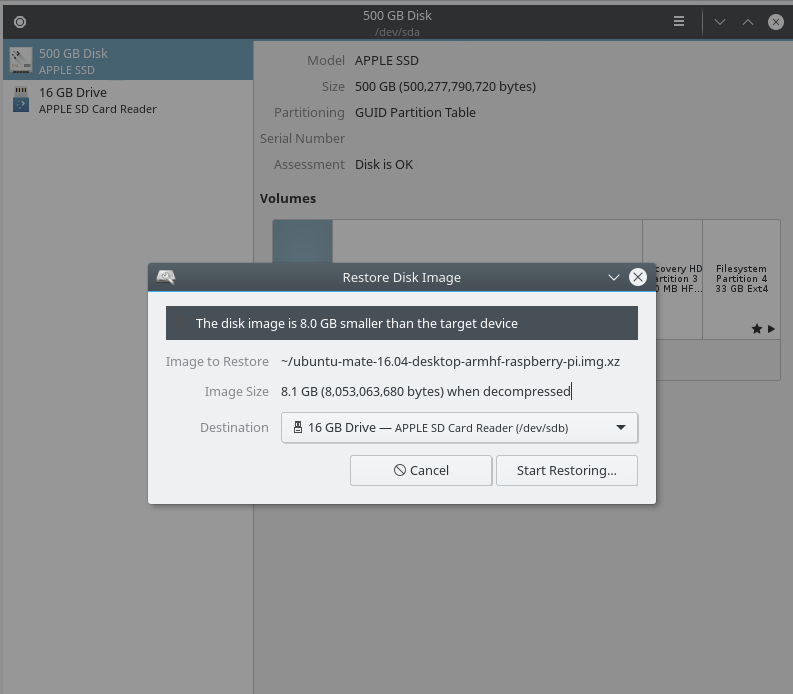
1. Double click the Ubuntu Mate 16.04 for Raspberry Pi image .xz file (the file name of the image you have might be different than that is in the screenshot), gnome disks will be opened. Select the destination to your MicroSD card, and click Start Restoring.
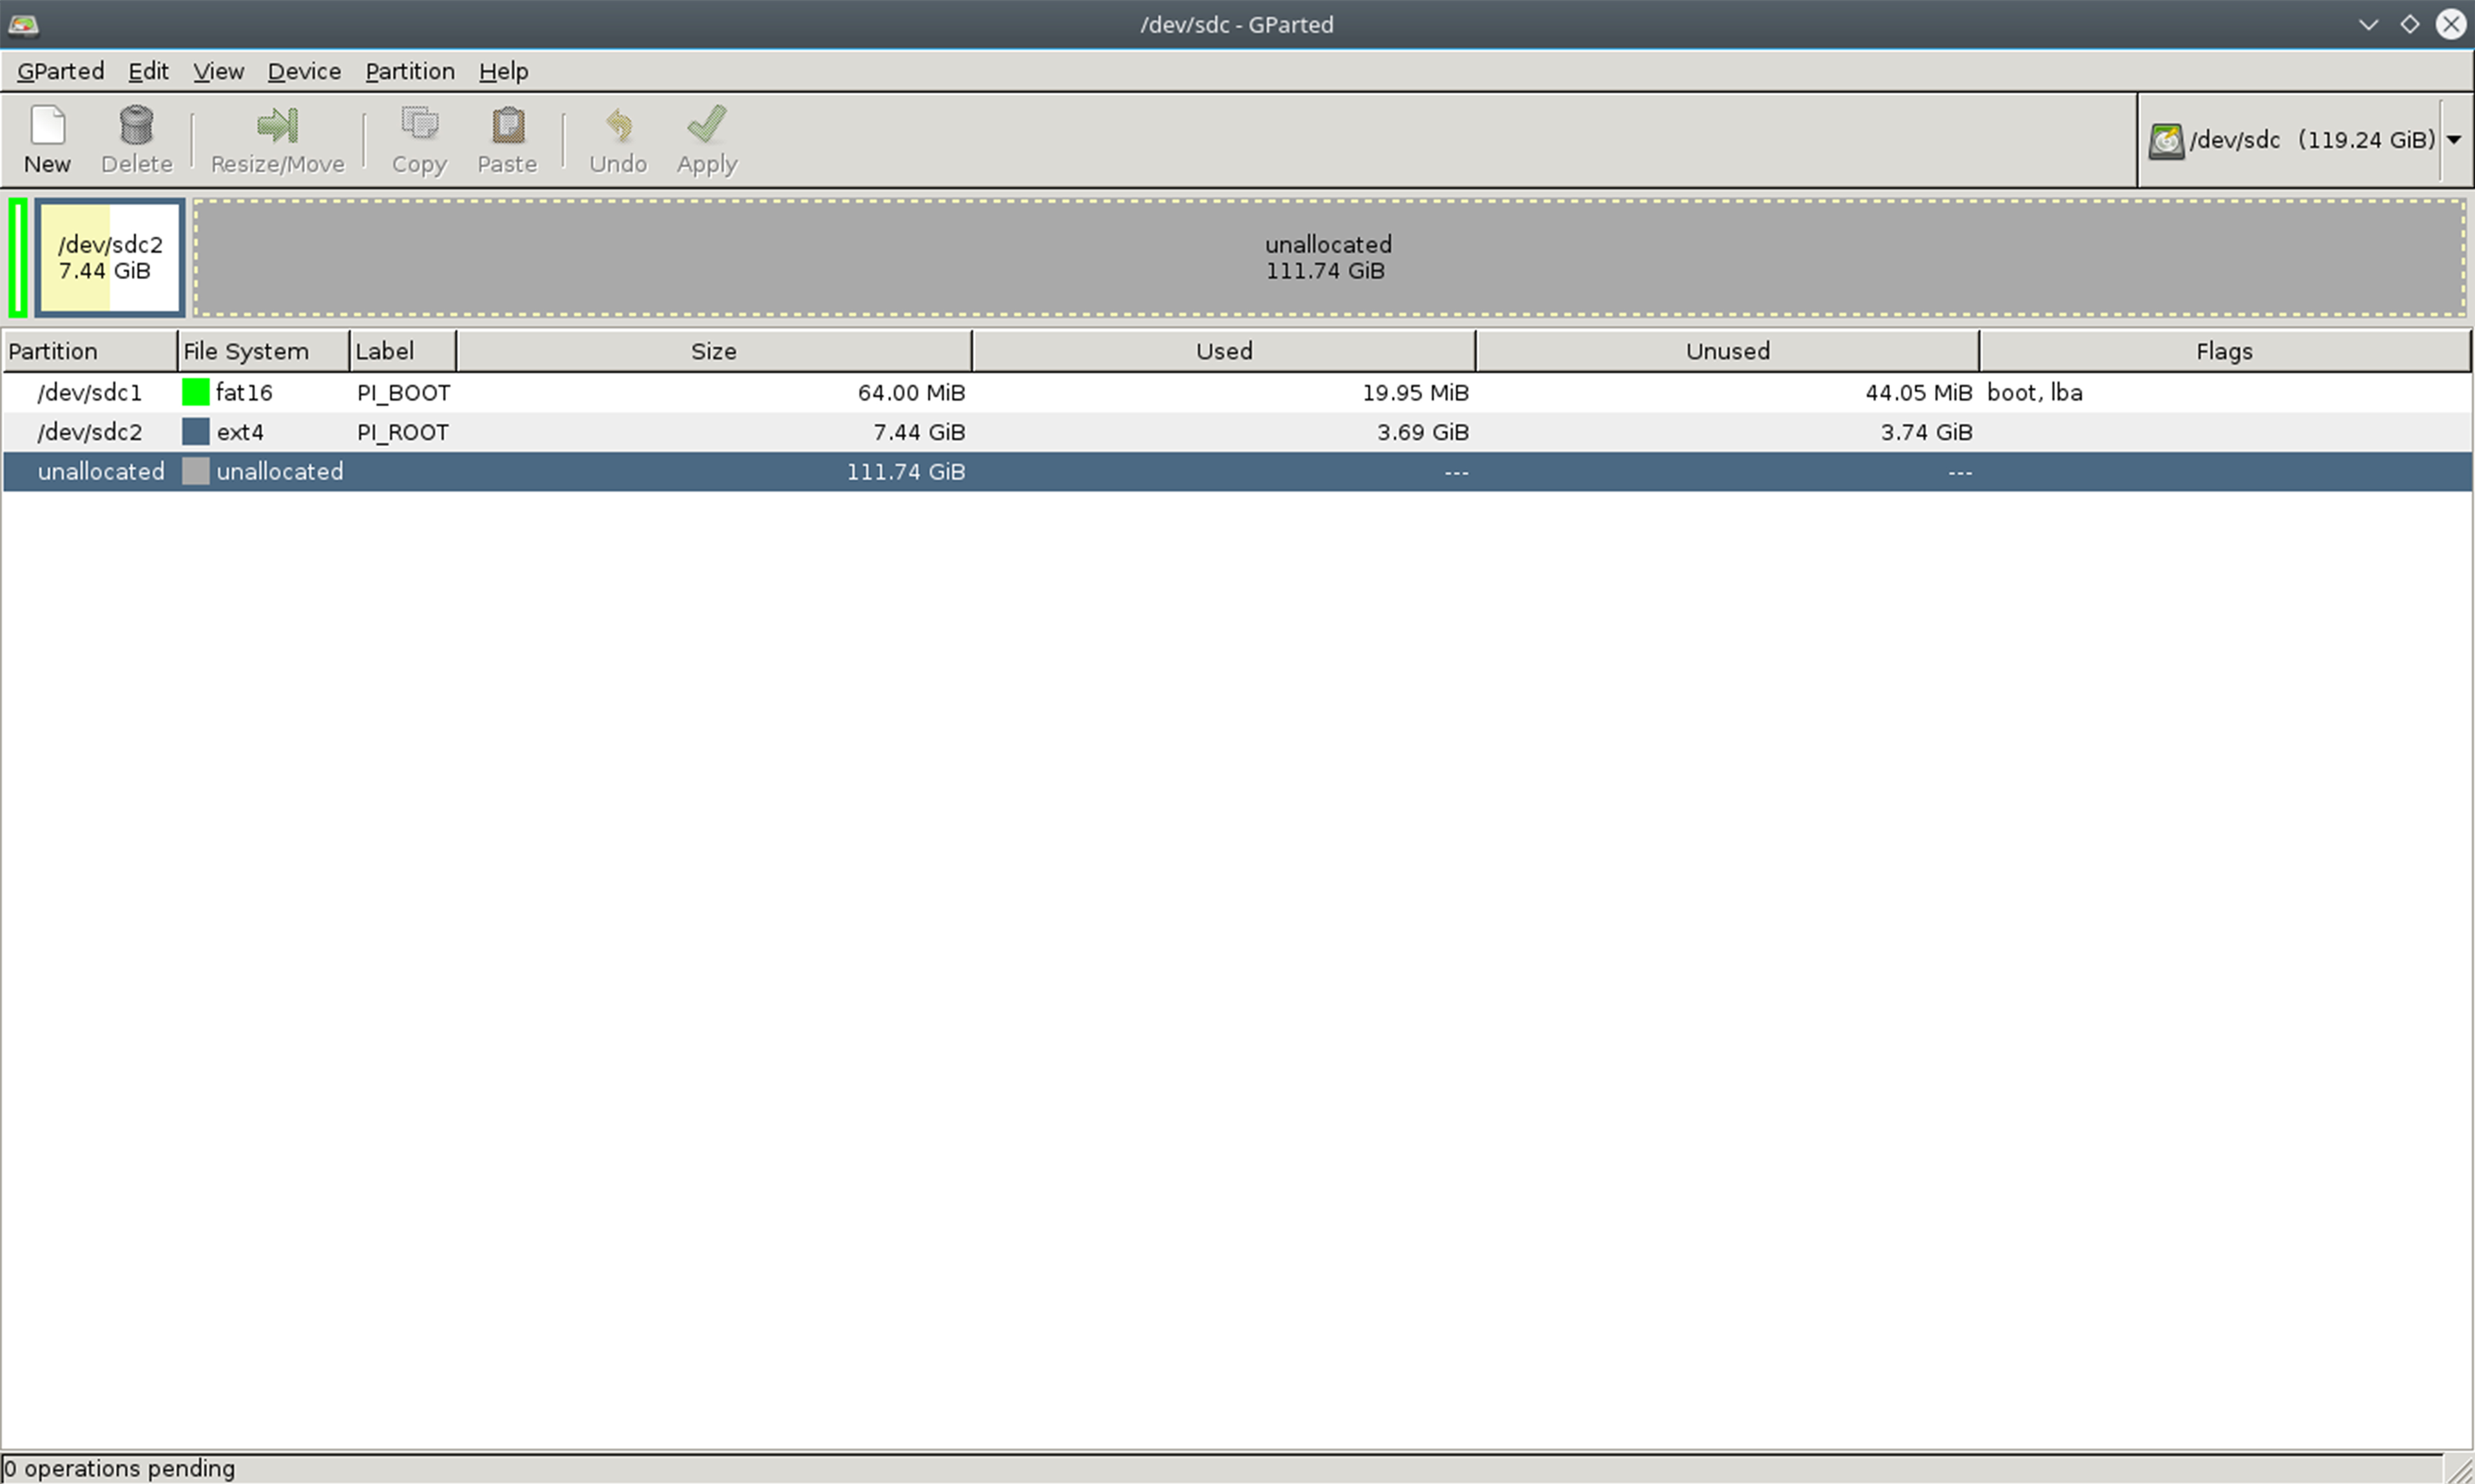
2. After finishing restoring, close gnome disks and open GParted. Select the MicroSD card, delete the second partition and create a Linux swap partition to fill the rest of space.
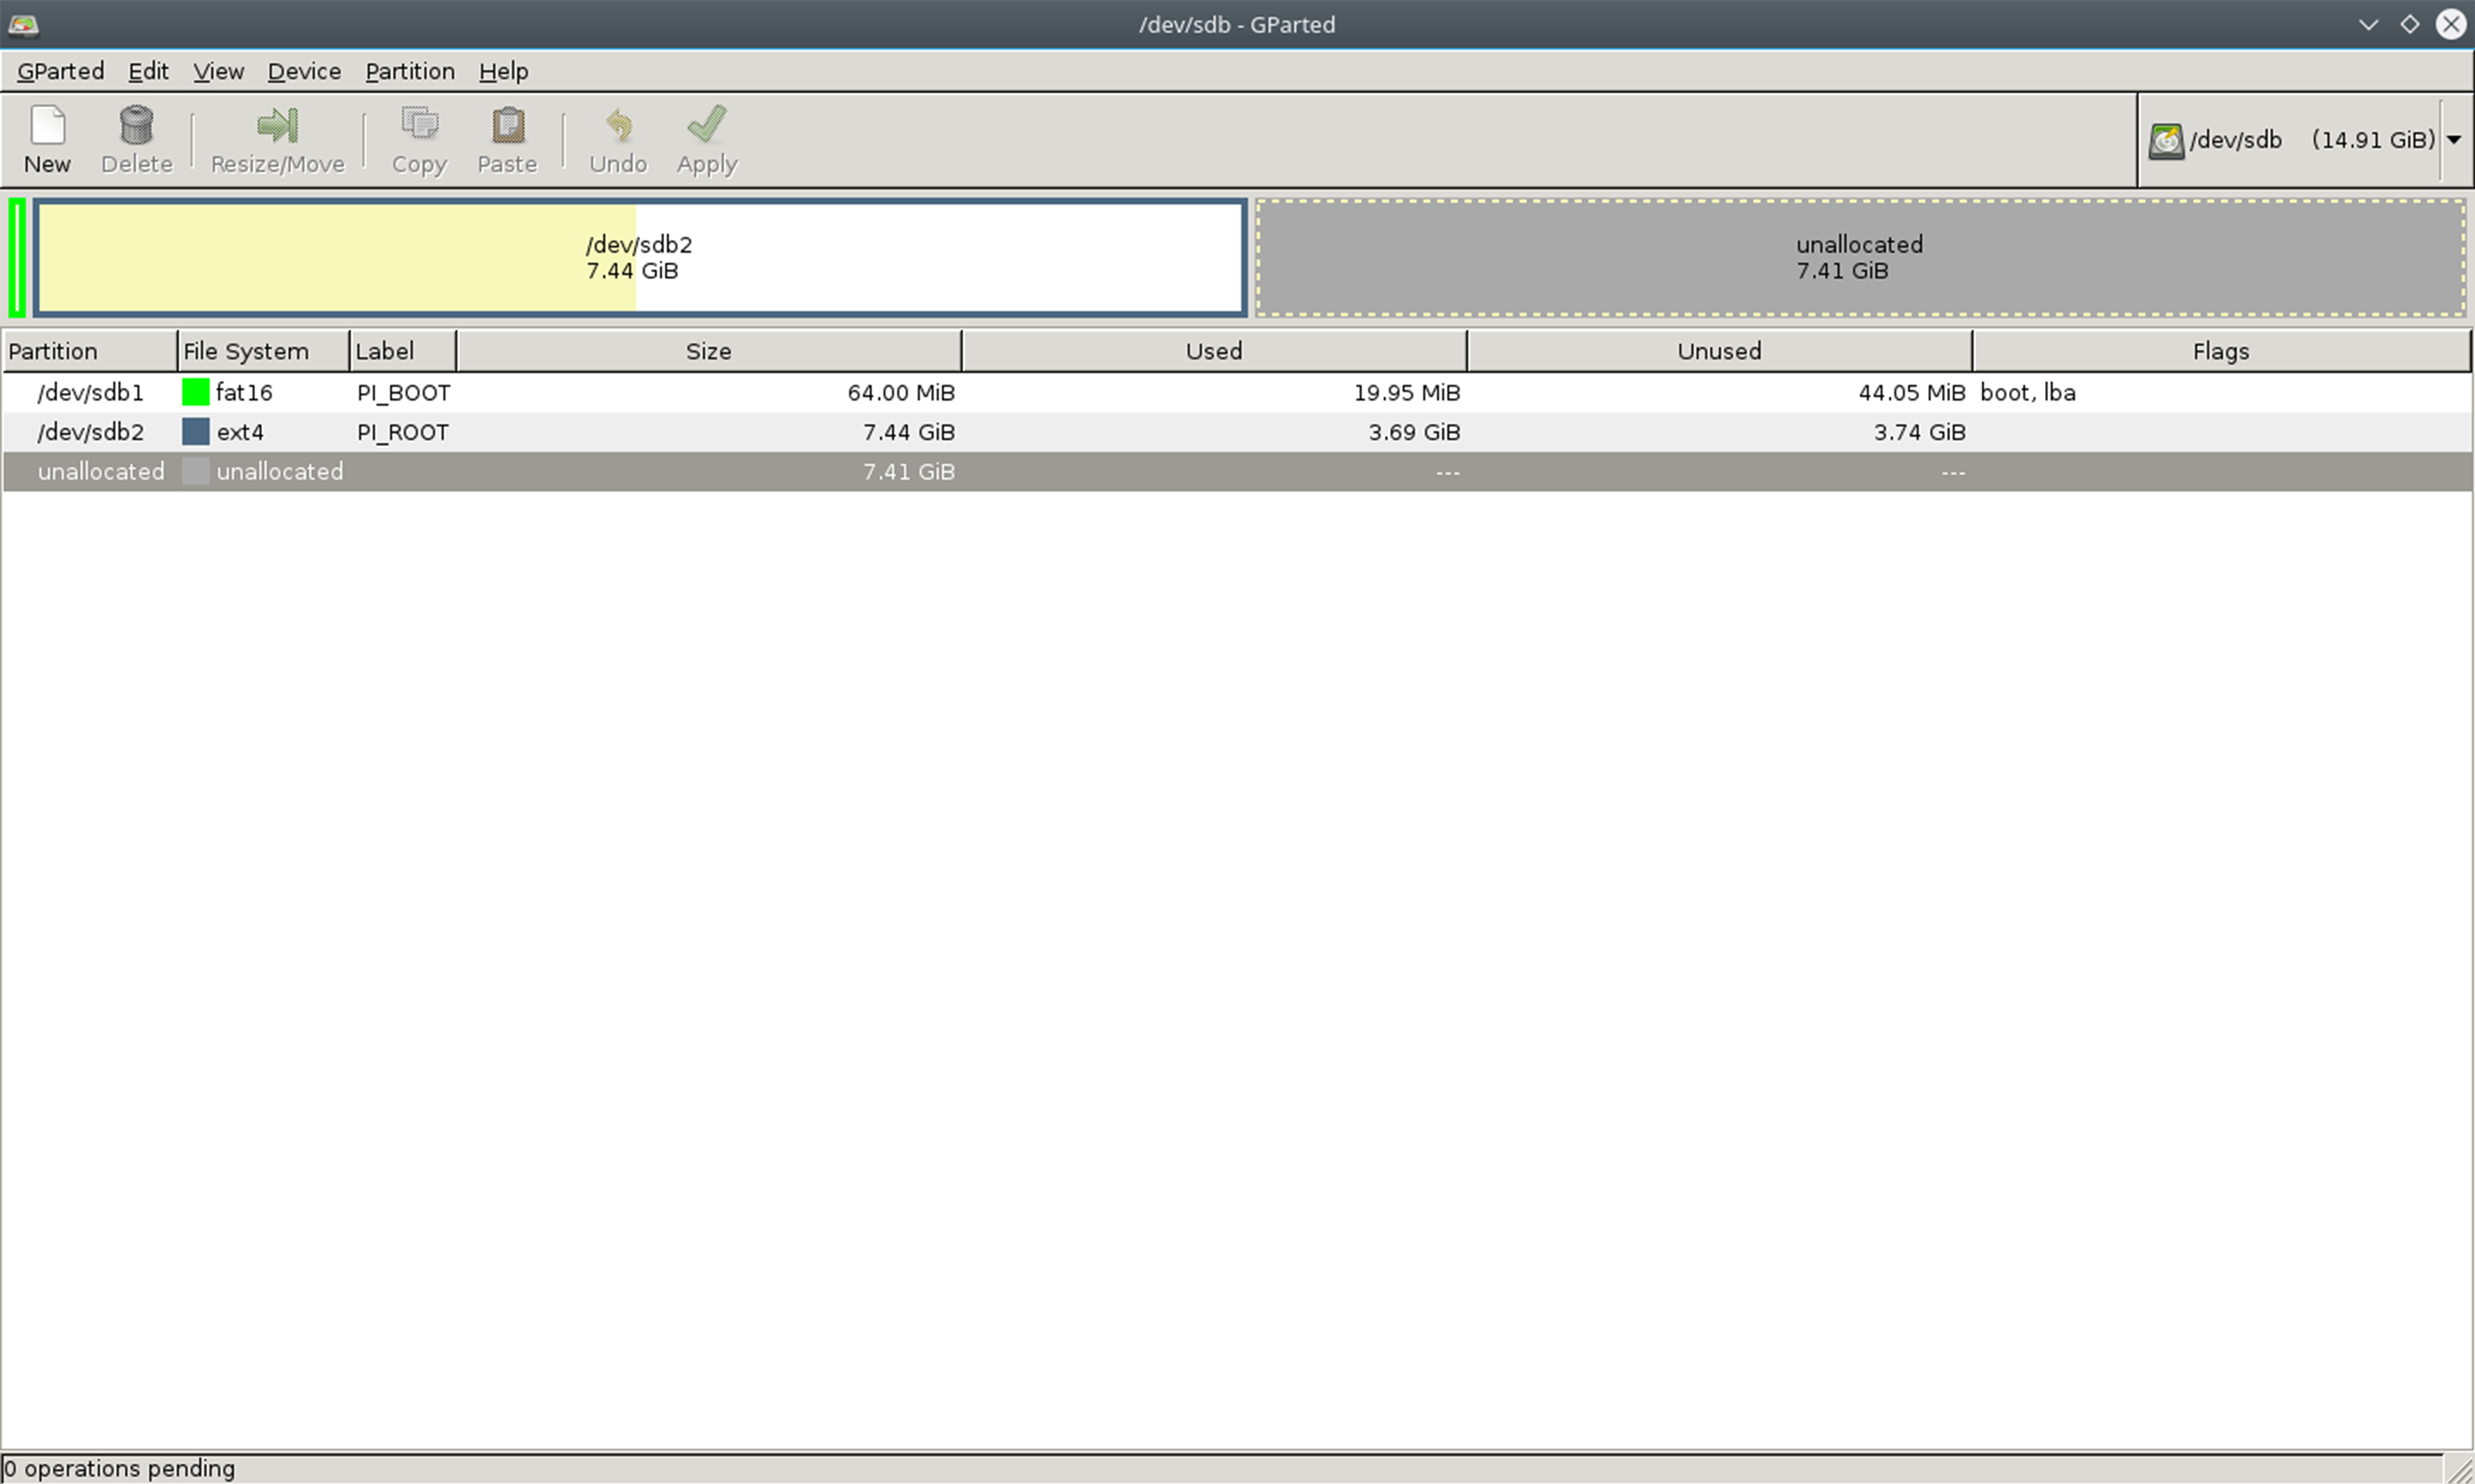
Before

After
Optional: If you want to make the PI_BOOT partition bigger, you have to move everything inside this partition out, delete the original boot partition, make a new fat16 partition with the size of 4096MB (or the size you like), and with the label PI_BOOT (uppercase of pi_boot), and finally move everything back to this new partition.
3.Close Gparted, navigate to cmdline.txt inside PI_BOOT partition, change root=/dev/mmcblk0p2 to root=/dev/sda2 and save it.
Prepare your flash drive:
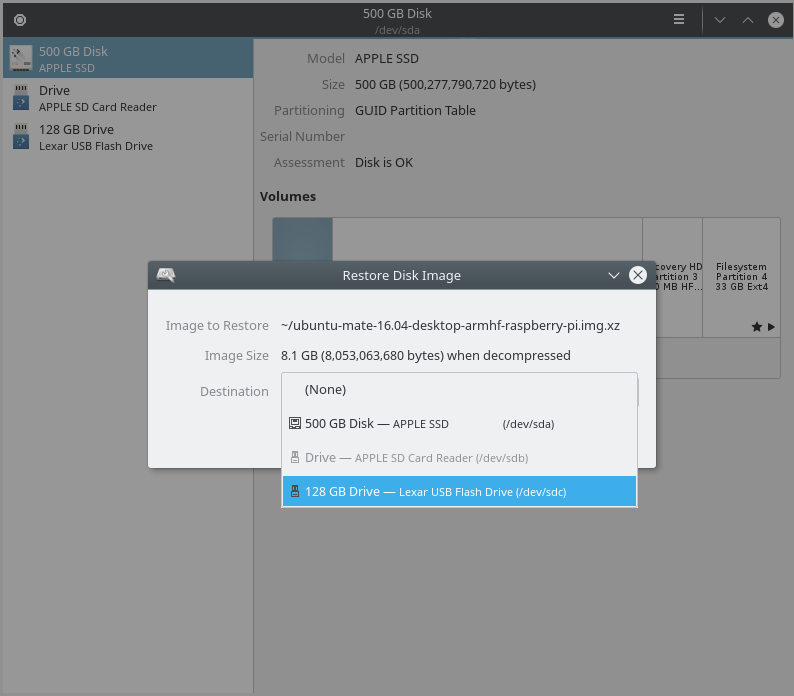
1. Double click the Ubuntu Mate 16.04 for Raspberry Pi image .xz file, gnome disks will be opened. Select the destination to your flash drive, and click Start Restoring (For some reason, gnome disks may close immediately after it opened. In this case, you need to restart your computer and try again).
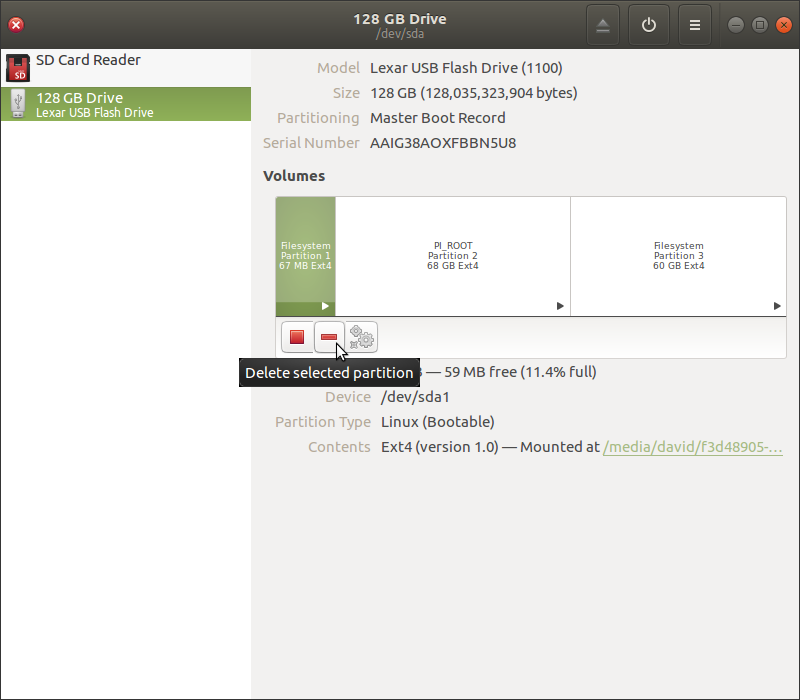
2. After finishing restoring, close gnome disks and open Gparted. Select the flash drive, format (not delete) the first partition to ext4, expand the second partition to whatever size you like, and create another partition with a filesystem of ext4 to fill the rest of space.
Note: Resizing and creating a partition may require some additional time (10 minutes is normal), please wait until all operations are performed successfully. It's normal that a new ext4 partition has a significant amount of used space after formatting.
Before
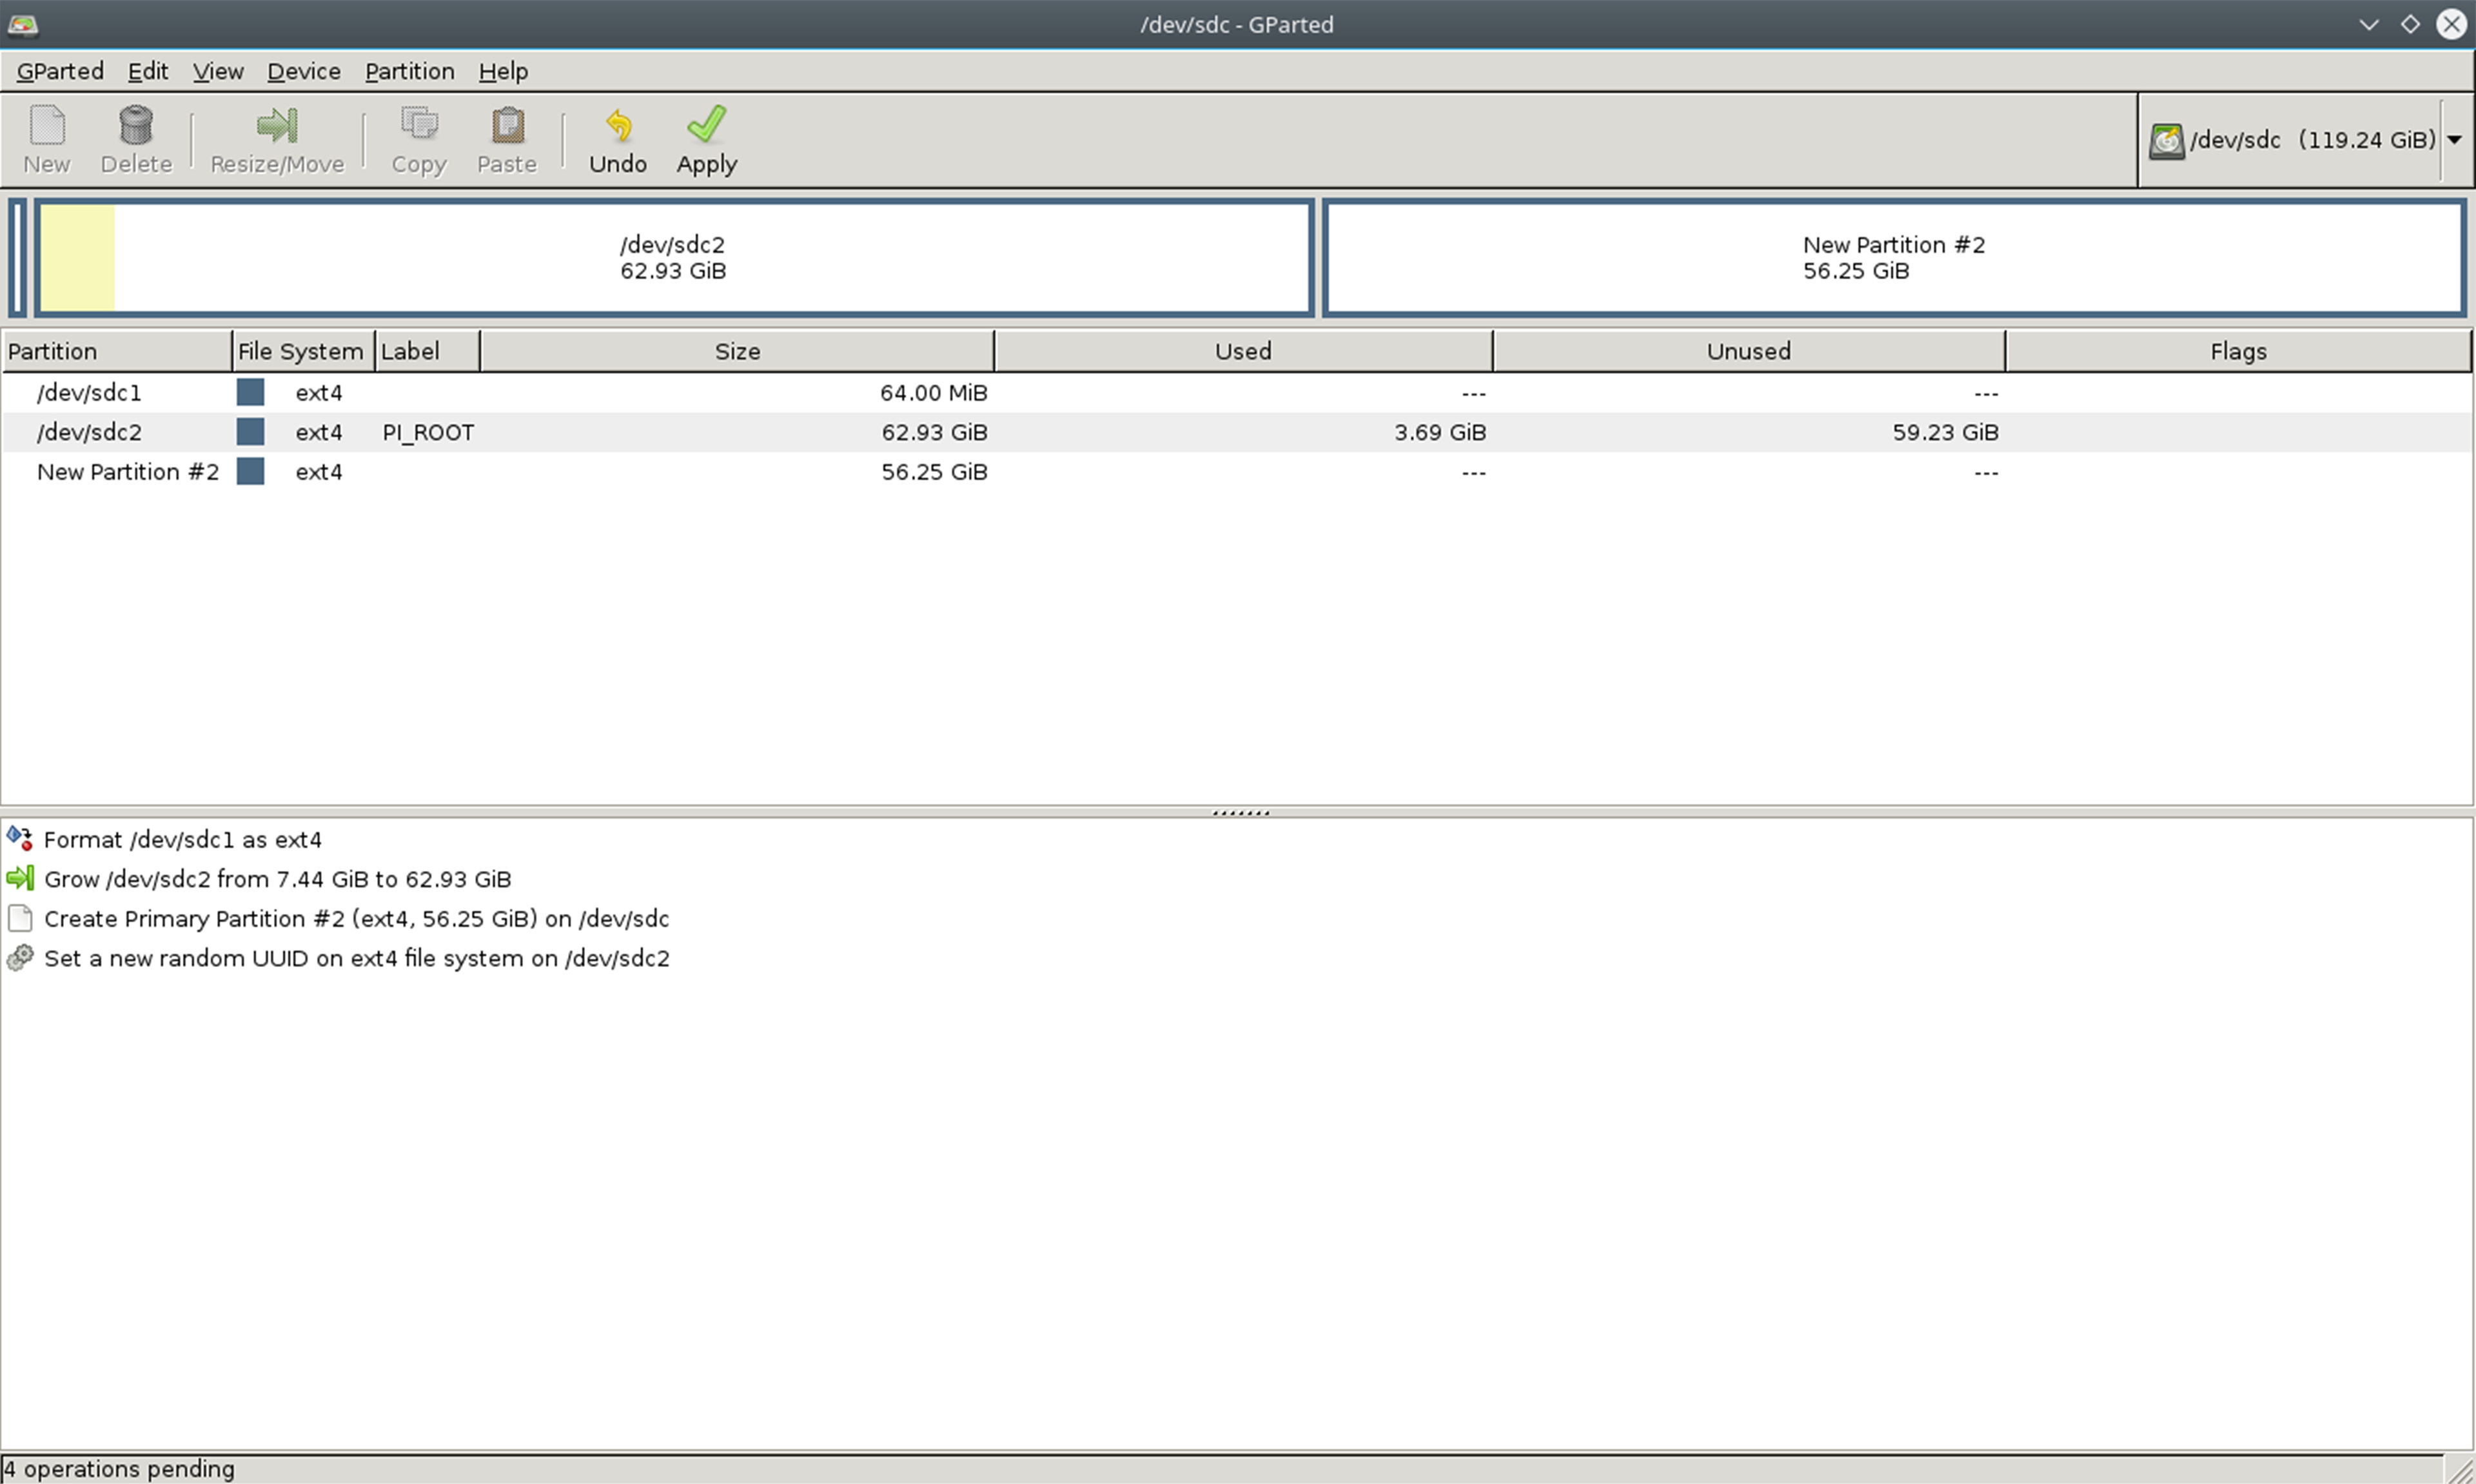
After
3. Close Gparted and remove your flash drive.
A little trick: For security improvement, you might consider create a random new UUID for all partitions on flash drive and MicroSD card, since all partitions in the Ubuntu Mate disk image have fixed UUIDs.
First setup on Raspberry Pi
1. Insert MicroSD card and flash drive to Raspberry Pi, and make sure that there is only one flash drive on Raspberry Pi at the moment.
Note: If you use the 16.04.2 image, you will notice an error about can not expand / partition during first boot. In this case you can ignore it.
2. Startup Raspberry Pi, and you will then see System Configuration after finishing booting. In "Who are you" screen, you can choose any username but you need to set up a password.
3. After System Configuration, wait for a while, there will be another setup screen.
4. When you see the login screen, login the computer (Do not place any file in this account, it will be removed later), then open gnome disks (disks, under Accessories), you will then need to adjust the auto mounting for all partitions.
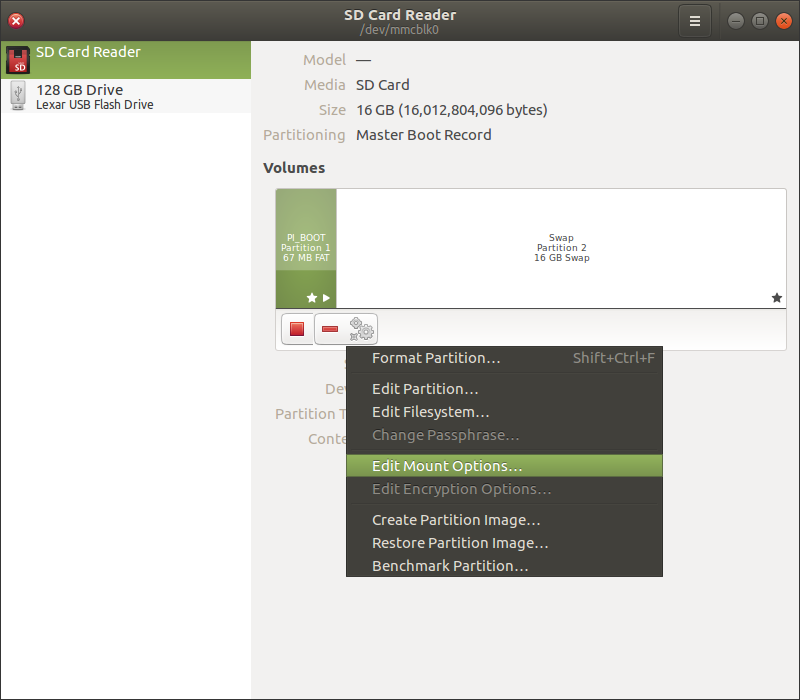
5. First, select the first partition of MicroSD card, click the gear icon, and choose Edit Mount Options.
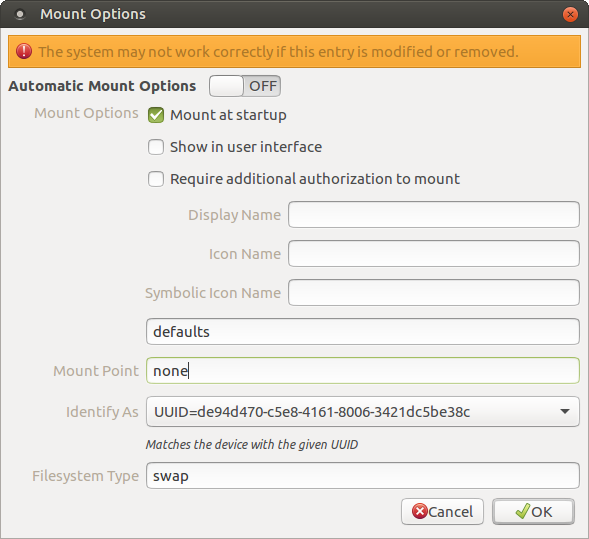
6. Adjust the setting to the picture below, just be aware that your partition's UUID might be different then the UUID in this picture. Please choose UUID=************** under "Identify As" to increase the security.

7. For the second partition of MicroSD card, edit Mount Options and adjust the setting to the picture below.
8. Delete the first partition of flash drive.
9. For the first partition of flash drive (after deleting the partition in step 8) , edit Mount Options and adjust the setting to the picture below.
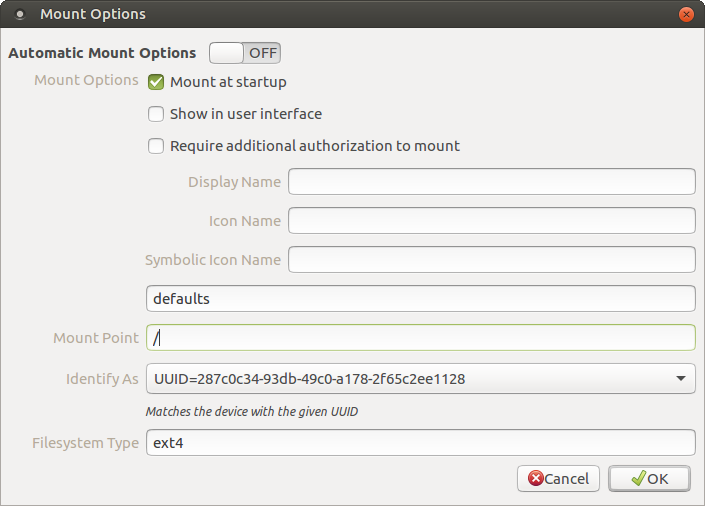
10. For the second partition of flash drive (after deleting the partition in step 8) , edit Mount Options and adjust the setting to the picture below.

11. Now, restart Raspberry Pi, but you can't login after the startup. Hence you need to login as a guest. After login in, open gnome disks (disks) and make sure that the mount points of all partitions are set up correctly.
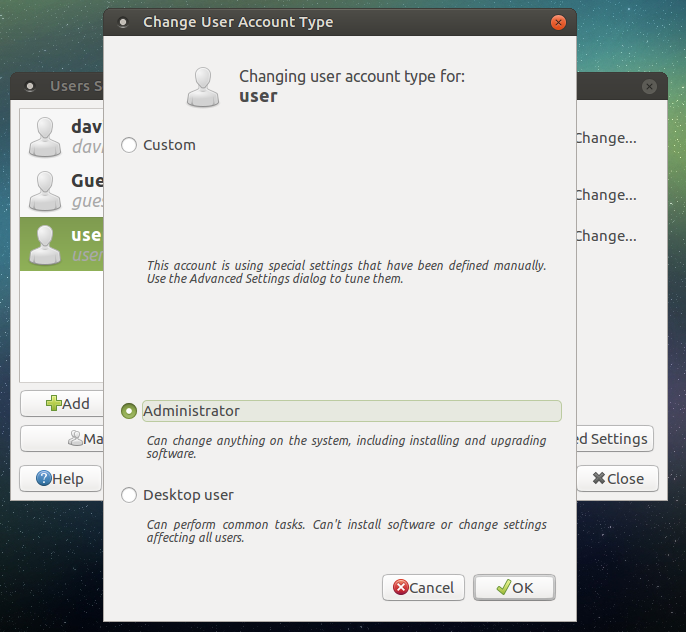
12. Then, click System on the top menu bar, then Administration, then Users and Groups. Make another user at first (with a password), change User Account Type to Administrator. Then you can remove the user you can't login and restart Raspberry Pi afterwards.
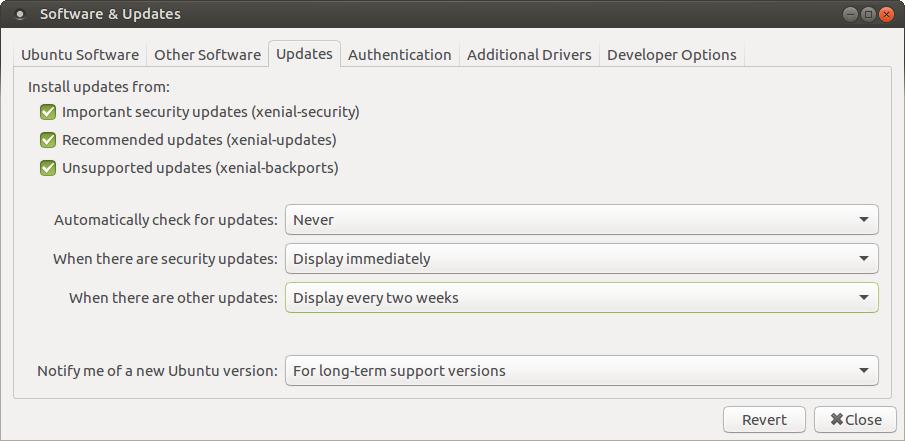
Configure Software Update
Open Software & Updates, please change settings in first 3 tabs to the picture below.
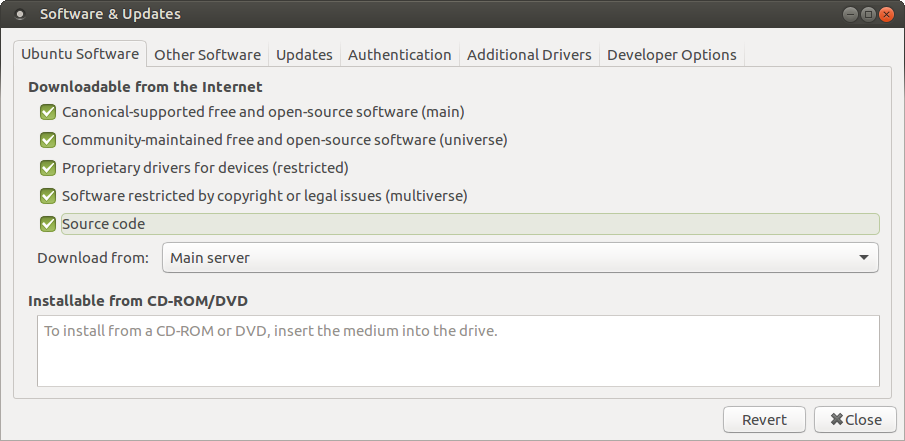
Check all boxes
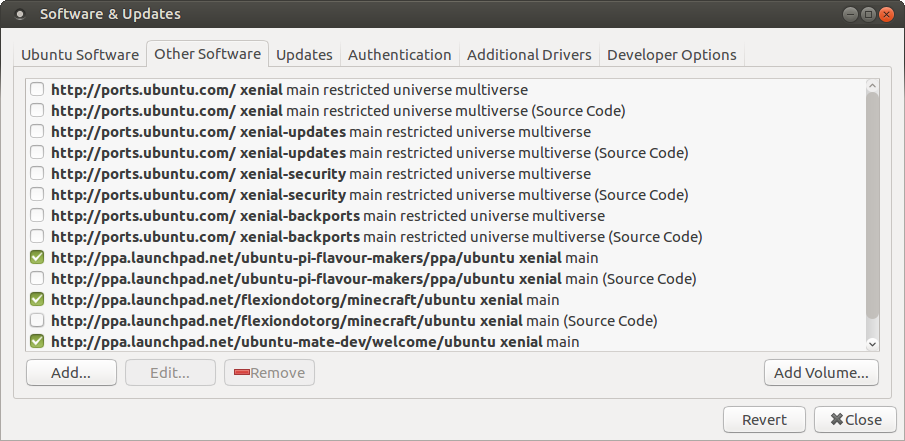
Uncheck first 8 boxes
Further Tweaks
Disable root account
If you had previously enabled root account, execute this commend to disable it:
sudo passwd -dl root
Adjust the GPU memory allocation
Type sudo pluma /boot/config.txt and execute it in a terminal, under Memory Settings, uncomment disable_l2cache=0 and change it to disable_l2cache=1; uncomment gpu_mem=128 and change it to gpu_mem=260 (Don't worried, you have a swap partition).
Set up SSH server
Update: On Ubuntu MATE 16.04.2, SSH server is disabled by default, you need to use raspi-config to enable ssh server.
Hide X server from startup
If you mainly use ssh to connect Raspberry Pi and you want to disable X server at startup, simply run sudo graphical disable and restart. Execute sudo graphical enable if you wish enable X later. Note: If you have connected to a Wi-Fi network earlier, Ubuntu will connect the last access point after login.
Update: On Ubuntu MATE 16.04.2 your can disable/enable the desktop environment using raspi-config.
Update System
After connected to the network, update the system and install restricted components by executing these commands.
sudo apt update
sudo apt upgrade
sudo apt install ubuntu-restricted-extras
sudo apt upgrade
sudo apt install ubuntu-restricted-extras
After finishing update, reboot the system.
Update Kernel and Firmware
Just simply run sudo rpi-update in terminal.
Install KDE Desktop environment
If Mate desktop environment doesn't look nice to you, you can try install KDE desktop environment by executing sudo apt install kubuntu-desktop.
When proceeding the installation, you will receive an error message like this:
Errors were encountered while processing:
/var/cache/apt/archives/kde-config-telepathy-accounts_4%3a15.12.3-0ubuntu1_armhf.deb
/var/cache/apt/archives/kaccounts-providers_4%3a15.12.3-0ubuntu1_armhf.deb
N: Ignoring file '20auto-upgrades.ucf-old' in directory '/etc/apt/apt.conf.d/' as it has an invalid filename extension
E: Sub-process /usr/bin/dpkg returned an error code (1)
and it prevents you from installing and removing software.
You have to do something in order to solve this problem by executing the following commands in terminal:
sudo dpkg -r account-plugin-google
sudo apt -f install
sudo apt install account-plugin-google
sudo apt -f install
sudo apt install account-plugin-google
After you restart your computer, you will be able to use KDE desktop environment (You might need to wait for several minutes for KDE to finish loading, please be patient).
Remove graphical boot loader
Sometimes graphical boot loaders can prevent loading graphical login screen; on Ubuntu MATE 16.04.2, you can enable/disable graphical boot loader in raspi-config.
Known Issues (these issues exist on my Raspberry Pi 3):
1. Activity menu on GNOME desktop will randomly appear even you don't move the pointer to the top-left corner.
2. You should only use non-gl driver and not turn the experimental gl driver on. If you use Full KMS, you will not able to login to desktop. If you use Fake KMS, X will crash randomly and you will be forced to log out.
3. Kernel source code for Ubuntu on Raspberry Pi is currently unavailable.
Some useful tweaks for /boot/config.txt:
These 2 configs are adapted from this eLinux website:
disable_audio_dither Disables dithering on the PWM audio algorithm. Try adding disable_audio_dither=1if you experience issues with white noise on the audio jack.
Add arm_control=0x200 will tell Raspberry Pi 3 B to start in ARMv8 mode (Important: Ubuntu currently unable to boot when the machine is on ARMv8 mode).